Great Greens!

Did you know that you are supposed to eat 3 cups of green veggies every day?  (And no – iceberg lettuce does not count!)  Some people go nuts over salad, so this isn’t a problem for them.  If you’re like me, the thought of salad EVERY DAY gets old after a while.  I like to change it up a bit.  Here are a few tasty ways to prepare greens that I serve at my house, and you may just want to try.  For all of you knowledge junkies, click on each picture to learn about the nutritional value of each of these “Great Greens”!

Spinach                                                       

Grab a bag of fresh spinach and throw it in a saute pan on medium low heat with some butter, fresh minced garlic, and salt and pepper.  Use the whole bag (about 4 servings) because it will cook down considerably.  Saute, stirring frequently for about 4 to 5 min.  It tastes GREAT when you serve it up fresh – NOTHING like the canned stuff. Yuck!

Bok Choy

Chop a head of Bok choy and throw it in the saute pan with some butter or olive oil and salt and pepper as well.  Saute on medium heat for about 5 min.  This is a tasty green that not a lot of people think to use.

Swiss Chard or Green Chard

Chop the chard and add to saute pan with about a tbsp of olive oil.  Add shiitake mushrooms and fresh minced garlic, a touch of lemon pepper and a pinch of cayenne pepper.  DO NOT SALT this green as it tastes salty enough with the olive oil – even for salt lovers!  You can also swap the Chard for Kale, which is very rich in nutrients.

These are a few of my ideas for easy ways to get your servings of greens in.  Now let’s hear from you.  What are the ways your family does greens?  Do you get creative, or is your family good with the basic green beans, etc.?

Meat Loaf – A Must Have

I am a Southern girl.  I come from a long line of true Southern women who know how to cook, pray, love, and gossip with the best of them.  One thing I have learned from my momma, and all those before her, is every woman needs to have a good meat loaf recipe under her belt.  Yes, take a trip with me back to the days of June Cleaver and Laura Petrie; the days when the way to a man’s heart was through his stomach.  Ok, so maybe some things never change.  My point is, there is a goodness, a heartiness in this All-American classic that brings the family together.  Not only that but it is a simple entrée to make, and yet the family still appreciates that someone took the time to bake for them.  Let’s bring goodness back to the family dinner table.  Let’s bring back meat loaf!

Meat Loaf  from the Better Homes and Gardens Cookbook

Preheat oven to 350°F

2 beaten eggs

3/4 cup milk

2/3 cup fine dry bread crumbs or 2 cups soft bread crumbs (I like the soft – great way to use those leftover heels!)

1/4 cup finely chopped onion

2 tbsp snipped fresh parsley

1 tsp salt

1/2 tsp dried sage, basil, or oregano, crushed (I like to use sage)

1 1/2 lbs ground beef, lamb, or pork

1/4 cup catsup

2 tbsp brown sugar

1 tsp dry mustard

1. In a bowl combine eggs and milk; stir in bread crumbs, onions, parsley, salt, sage, and 1/8 tsp black pepper. Add meat; mix well. Lightly pat mixture into an 8 x 4 x 2-in loaf pan.

2. Bake in a 350° oven for 1 to 1 1/4 hours or until internal temperature registers 160°F. Spoon off fat. In a bowl, combine catsup, sugar, and mustard; spread over meat. Bake for 10 minutes more. Let stand for 10 minutes before serving.

This is a super simple recipe that is easy to whip together and gives you plenty of time to make your side dishes while it is baking.  I like to have mashed potatoes with meat loaf.  A fresh tossed salad or green beans also go well with this dish.

Symphony in My Mouth

Pan Seared Chicken With White Wine Tomato Sauce

For those of you who like precise measurements and control over what every little ingredient is doing, this one is probably going to drive you a little crazy.  For those of you who love to go by “feel” and watch everything tie in together beautifully like a great story,  give this recipe a try.  No matter the personality type (whether you have to struggle through or it comes easily to you), you will not be disappointed.  Believe me.  I made this for dinner tonight; we have no chicken left, but I am figuring out what to have for lunch tomorrow, so I can enjoy that sauce all over again.

Stage 1:  Heat some olive oil over medium in a large skillet (choose a skillet with a lid).  Add raw chicken pieces to hot oil (I used 5 good-sized, bone-in thighs).  Let the chicken brown a bit, cooking about 20 min.  Add a bit of soy sauce, Worcestershire sauce, white wine (about half a cup, whatever you have will work – I actually used some white zinfandel tonight), and spices.* Cover with the lid. Cook about another 15 minutes.  Be sure you are turning your chicken every 10-15 min or so throughout the entire process.

* My spices: Season All Seasoned Salt, Garlic Salt, Garlic Pepper, Lemon Pepper, and Sage (be liberal with the seasoning)

Stage 2:  Add fresh minced garlic and finely chopped onion (about a third of a cup).  I also added a dash of salt and black pepper at this point.   Cover with the lid and cook for another 20 – 25 min.  (You do not want to add this too early or it will burn in your olive oil and wine sauce.)  Be sure to use your lid most of the cooking time to keep that lovely moisture in your chicken.

Stage 3:  Add chopped tomatoes (I used 3 romas, and left them in rather large slices), chopped fresh parsley, and about half a cup to a cup of chopped fresh spinach.  Just distribute evenly over the top of your chicken and sauce, and cover with the lid again.  These need to be added around the last 10 minutes of cook time to keep them from burning up or withering to nothing as well.  Don’t forget to turn that chicken!

Cooking chicken can be tricky.  If you are a pro at it, then you will understand the importance of my 3-part stages.  If not, do not be ashamed to cut into your chicken periodically to check on it.  Better to have some chicken that has been hacked at a little than to put out raw food or burn everything else because it took longer to cook the meat than you originally thought.  Plus, this sauce is so wonderful that you will want to spoon some over your chicken when plating, and no one will be able to tell the difference.

Fun For All Salad Bar

Family Salad Bar


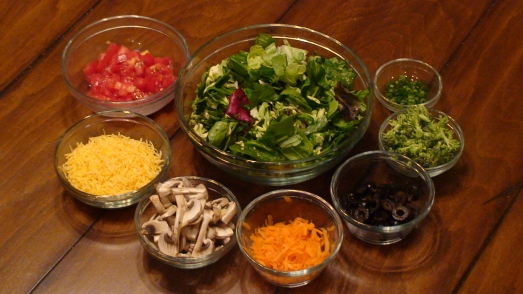
If you are like me you are always trying to find ways to get the kids to eat their vegetables.  Sometimes I hide them in sauces and mixtures; at other times I try to make them fun so they want to eat food that is good for them.  This was a fun family salad bar we made to encourage them to pick out and add to their own salads however they wanted.  As you can see we had some nice greens accompanied by some color and tasty additions; like olives and mushrooms.  I could have gone all out and added croutons, boiled egg, cauliflower, colorful sweet peppers, etc.  You get the idea.  The trick is to put the things you absolutely want them to have in your base – in the greens.  Then give them a nice big bowl for them to fill on their own.  Everyone really enjoyed our salad bar; so much, in fact, that there was only enough left for me to have as a side salad for lunch the next day.

Crunchy Mixed Greens and Brussel Sprouts Salad

My base greens require a lot of chopping, which works fine for me because I enjoy slicing and dicing.  If chopping is not your thing, consider making one big salad and storing in an airtight container to eat on for the week.  Add fresh tomatoes and cheese to daily portions.

Combine mixed leafy lettuces (bag salad is fine), chopped fresh spinach, chopped fresh Brussel sprouts, chopped fresh basil and parsley, chopped green onion, chopped broccoli, shredded or chopped carrot.  Anything else that appeals to you.

Homemade Dijon Dressing

3 tbsp Plain Non Fat Yogurt

1 tbsp Miracle Whip or Mayo (Optional – use more Yogurt if you prefer to skip the Mayo)

2 tbsp sugar or Agave Nectar

1 tsp Dijon mustard

2 tsp vinegar

Whisk all ingredients together.  This dressing has somewhat of a coleslaw dressing taste with a little kick to it.  It is meant to be lightly used; toss in salad to lightly coat.

Cook With Me Valentine Event

Chocolate-Caramel Bars

This recipe is from Better Homes and Gardens, and it is what I will be making for my son’s Valentine party at school.  They are beautiful and look so delicious!  I would like to invite you to bake these “with me” and let us know how yours turned out.  I will be using my Pampered Chef stoneware to bake these in.  Let us know any special tricks or equipment you used to make your bars!

Chocolate-Caramel Bars

1 cup all-purpose flour

1/2 cup packed brown sugar

1/2 cup butter

2 cups coarsely chopped pecans

1 cup flaked coconut

1 14-oz can sweetened condensed milk

2 tsps vanilla

20 vanilla caramels, unwrapped

2 tbsp milk

1 cup milk chocolate or semisweet  chocolate pieces

1.  Preheat oven to 350°. For crust, in a medium bowl stir together flour and brown sugar. Using a pastry cutter, cut in butter until mixture resembles coarse crumbs. (If you do not have a pastry cutter, you can use a fork instead.) Press onto the ungreased bottom of a 13 x 9 x 2 inch baking pan. Bake for 15 min. Sprinkle pecans and coconut over hot crust.

2.  Meanwhile, for filling combine condensed milk and vanilla. Carefully spread over pecans and coconut, spreading evenly.

3.  Bake for 25 to 30 min more or until filling is set. Cool in pan on a wire rack for 10 min.

4.  Meanwhile, in a small saucepan combine caramels and milk. Cook and stir over medium-low heat just until caramels are melted. Drizzle caramel mixture over filling. Sprinkle with chocolate pieces. Cool completely. Cut into bars. Makes 24 bars.

TO STORE: Layer bars between sheets of waxed paper in an airtight container; cover. Store at room temperature for up to 3 days or freeze for up to 3 months.

Be sure to check back in here at The Ripe Banana to see my recipe review, and I sincerely hope you will have some input of your own to provide. I can’t wait to hear how your bars turned out! 🙂

Reusing Leftovers: Chicken Pot Pie

Does your family eat leftovers very well?  Mine does not.  Most of the time if I do not reinvent a dish out of last night’s dinner, it will not get eaten; and I do not know about you, but I am not crazy about throwing money away like that.  You may not care.  I do.  Remember that Garlic Roasted Chicken we had a few nights ago?  Believe it or not, we had a couple of pieces left over.  This is what I made using that leftover chicken.  This recipe I am about to share with you is great for so many reasons: 1) it is hearty and sticks to their ribs, 2) it is a great way to reuse whatever leftovers you have in the fridge, 3) it is a great way to include veggies for those picky ones – this seems to be one of those flavor profiles that I can pass off easily with my finicky eaters, and 4) it tastes delicious!

Chicken Pot Pie

2 tbsp Butter or margarine

Chopped onion, celery, red/yellow/orange sweet pepper, mushrooms (fresh or canned)

1/4 cup flour

1 cup Chicken stock or 1 Chicken bouillon dissolved in 1 cup water

1/2 cream or milk

Frozen peas and carrots mixed, 1 boiled or baked potato (cubed)

1 1/2 to 2 cups chopped cooked chicken

Salt & Pepper

Refrigerated Pie Crust (1 or both)

1 Beaten egg and 1/4 cup water

Before I explain how to prepare all of this, I just want to insert that you can put all kinds of veggies in here.  If they are raw, start them with the onions and celery at the beginning.  If they are pre-cooked, add them after your sauce is added.  I have made many variations of this – I do not stress if I do or don’t have certain veggies, this one’s flexible.  I often leave out the potato because of the starchy crust.  Whatever you like and have to get rid of is fine.  I also like to add fresh herbs right before I put the filling in the crust; I have even put a bit of dill and a dab of Dijon mustard in the sauce for a different twist (which is very yummy too).

Pre-heat oven to 425°. Spray pie dish/casserole dish/baking square with cooking spray.  I like to line the bottom with 1 of the pie crusts, but you do not have to do this – you can simply cover your filling if you only have 1 pie crust dough.  Set aside.

Saute raw veggies in butter until tender (in this case it was onion, celery, red pepper, mushrooms).  Sprinkle flour over all and stir around for about half a minute.  Add chicken stock and cream or milk, stirring well.  You are basically making a gravy.  Add chopped chicken, frozen veggies, and any other pre-cooked veggies now.  Mix everything together and cook on Low to Medium heat for another 2 minutes or so.  Add any fresh herbs and potato now. Salt and pepper to taste, and stir together.

Spoon filling into baking dish and cover with pie crust.  Add the 1/4 cup water to the beaten egg and whisk together.  Brush the top of the pie crust with the egg mixture.  Bake in the oven for about 20 – 25 min or until crust is golden.